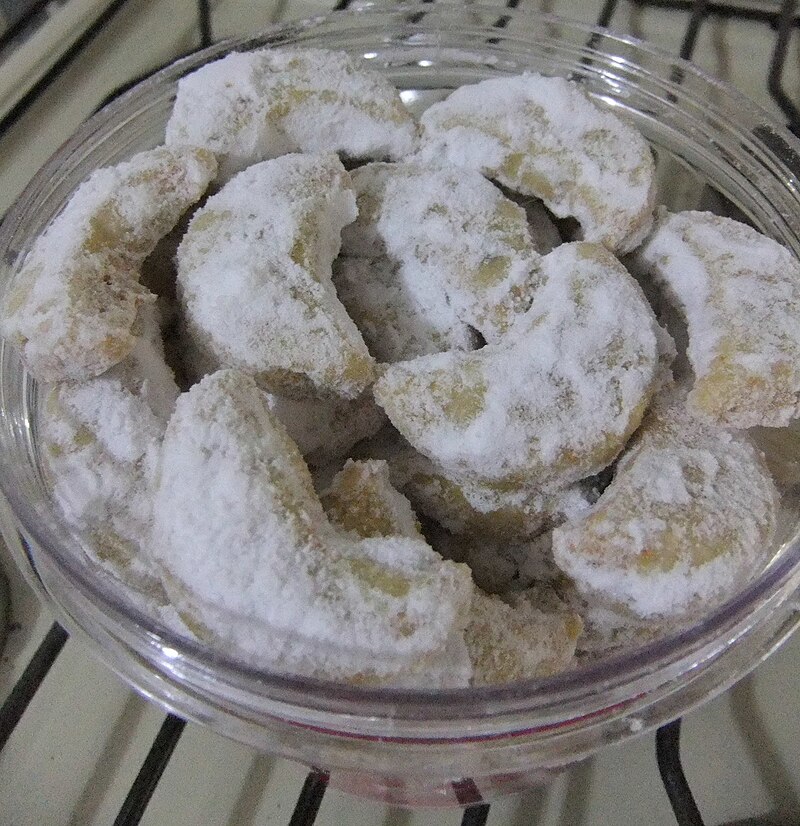
Kuih Bangkit Santan is a traditional Malay and Peranakan coconut cookie that is a staple during Hari Raya and Chinese New Year celebrations. These light, airy, and delicately fragrant cookies are made with tapioca flour, coconut milk (santan), sugar, and egg yolks, giving them a unique crumbly yet melt-in-the-mouth texture. The cookies are often shaped into delicate floral or traditional motifs, sometimes stamped with red food coloring for an extra festive touch. The key to perfect Kuih Bangkit Santan is in the slow baking process, which gives them their signature crisp exterior and a dissolving, powdery texture as soon as they hit the tongue. With a subtle coconut fragrance and just the right amount of sweetness, Kuih Bangkit Santan pairs beautifully with tea or coffee, making it an irresistible festive treat that brings nostalgia and joy to every household.
Prevent your screen from going dark as you follow along.
Get the coconut cream:
Please note that you CANNOT have any water/liquid in kuih bangkit so it’s important to use coconut cream. If you use coconut milk (which have water in it) your kuih bangkit texture won’t turn out right
It’s important not to shake the canned coconut cream. You can also chill the coconut cream in the fridge to help separate the cream from the water. I scoop up the cream on top. The watery bottom can be saved for other use in other recipes
Cook the tapioca flour (you can prepare few days ahead):
If you want to use the stir-fry method: Stir fry the flour with pandan leaves over low-medium heat on a dry wok without oil for about 1 hour. The flour will get lighter and lighter as you cook them. Remove the pandan leaves. Shake off any excess that clings on the leaves. Let them cool down completely and then store in an air-tight container until the next day if not using on the same day
Baking method (highly recommend): place the flour in a pan lined with some parchment paper.Bake at 300 F for 2 hours. Stir it twice halfway
Whether you are doing the stir-frying or baking the tapioca flour, the weight of the flour should be decreased by 13-14%, indicating your flour is “dry” enough now to be used for kueh bangkit. So if you bake 350 grams, it should be about 300 grams or close to that when it’s done baking. Reserve some to dust your mold and the baking sheets
Making the dough:
Let the tapioca starch cools down in the oven so it won’t collect any moisture. Then store it in an air-tight container for up to 7 days. I recommend using it the next day especially if it’s humid where you are.
Place the eggs yolk and icing sugar in a mixing bowl. Kinda mix them together a little bit with the whisk attachment from your mixer. Start at low speed and start to mix. It may appear to be dry at first, then turn to medium speed and the sugar will start to melt. Increase the speed to high and beat until it turns pale, creamy and thick, about 3-4 minutes. You can also use a balloon whisk to manually whisk the yolks and sugar until pale and creamy
Sift in the tapioca starch into the egg yolk mixture. Don’t shake the sifter as the tapioca starch will fly everywhere. Use a rubber spatula to gently run the flour mixture through the sift. It won’t come together yet. Add about 70 ml of the coconut cream first and then knead the dough with your clean hand. Most likely it will still be too dry to come together, add a bit more, tablespoon by tablespoon and continue to knead. Do this until you come to the point when you get a dry hard dough that is not smooth
Test the texture and consistency of the dough:
Pinch off a small amount and press the dough with your palm and when you let go, it holds the shape but when you press the dough with your fingers, it will crumble. This is the consistency we want to get that melt-in-mouth texture.
Shaping:
Preheat oven at 300 F / 150 C (I updated this since some of you need to bake for a long time). I have a conventional oven (with heating elements at the bottom). Put some extra tapioca starch in a spice bag, it’s easier to dust using this. Dust the baking sheets (I use an aluminum pan for best heat transfer) with some extra tapioca starch to prevent sticking. I find this works better than lining the pan with parchment paper. Dust the cookie mould with the extra cooked tapioca flour you made earlier. Shake off excess flour
Pinch off one dough and press it firmly into the mould. Keeping the rest of the dough covered. Use a sharp paring knife to trim off excess dough on the top. I found that I don’t need to dust the mould much because mine is made of plastic. Flip the mould over and firmly tap the mould to release the shaped dough. You shouldn’t have difficulty if the mould is nicely coated with flour. Place them on the baking sheet, about 1/2 inch apart. The cookies do not expand much at all. Repeat with the rest of the dough.
If the dough gets dry as you are working on shaping the cookies, you can add a bit of the extra coconut cream you have earlier and mix it again to make the dough less dry, but I don’t have to do this
Baking:
My oven uses bottom heat only. See the above post under “baking temperature” if your oven is different. Place them inside the oven 3rd rack from the top (or middle of the oven) and bake for 15 minutes (for 5 gr cookies). The bottom should be just very lightly golden brown and the top is pale white. You may need to experiment with your oven in the temperature and time as each oven is different
Dot with red food coloring (optional):
Use a toothpick and dot the tip of the toothpick on red food coloring and dot on top of the cookie. This is totally optional
Storage:
Store in an air-tight container once they’ve cooled down completely and they will last for 1 month at room temperature. It tastes the best the first week you made them